Wednesday, January 25, 2012

Today Pearl and I had (yet another) brush with what I like to call 'The War on DIY'. You may have noticed that the current political and economic system of hyper-consumption (yep, I'm talking about the 'C' word) doesn't want you to feel like you can do/make/fix things yourself. They like to make you think you need to pay someone to do/make/fix things. It's disempowering, and it gives me the shits. Because what it results in is a massive level of disconnection between people and the things they consume. I first came to this realisation about 4 years ago when Morag and I made a dining table for Pearl.
Pearlie, being the consummate entertainer and hostess with the mostess, was yearning big-time for a big, lovely old dining table. These, we soon discovered, are, without exception, expensive. Like, out of our league expensive. Being a gung-ho German who aims to please my lady friend, I figured I could give a bit of furniture-making a go. How hard can it be, right? Enter Morag (lovely, also gung-ho, hands-on type lady) some old tongue and groove floor boards from Coastie's big shed and a few bits of treated pine we found lying around somewhere. We devised a pretty rough strategy for building the table, based on nothing in particular, then set to work. A few hours later, we had a pretty big, wooden dining table that can happily seat 10 people, and squashily seat 12. Sure, it's a bit rickety on account of neither of us really considering, oh, you know, bracing or anything like that, but boy were we proud. And empowered.
Since then I have been suspicious when people tell me I can't do something. Not to detract from professionalism - hell no! Some people are just good at doing stuff! But you'd probably be surprised by the amount of things you can do a decent job of yourself. Read some books! Have a go! If you use recycled materials, which are usually cheap and/or free, it kind of doesn't matter if your project falls over (unless it's house, I guess) - just try something smaller next time. And remember to brace it.
Obviously, my current, kinda big DIY project is the building of our home, owner-builder style. This is what the authorities (namely the bank) are trying to thwart. But we shall overcome! And I just know that our place is going to be more awesome, and more true to the life we're trying to lead, if we have to do it our own way, with our own resources, even if it takes a little longer.
In celebration of our disregard for The War on DIY, I'm passing on the instructions for a cute, quick, recycle-y craft project: The beach poncho.
Made from a muslin baby wrap (I had a ton I was hanging on to but didn't know why) it is perfect for when your little friends get out of the water, all shivery and wrinkled, needing a little warmth and sun-protection on their adventures on the shore.
First, fold your wrap in quarters. Next, on the folded corner, cut out an approximately head-sized hole (can be good to use a hat for guidance - you don't want to make it too big).
Now, on your sewing machine, use some bias binding to finish the edge.
I decided to make some bias tape (that would be a strip of fabric cut on the bias) for this one, but the thick bias binding you get at a craft/sewing shop will be perfect (that's what I used on the green one Olive is wearing in the pictures). Always be careful when you're sewing on bias binding that you don't stretch either the fabric, or the tape as you're sewing it on. In this case especially you want to make sure you don't stretch the neck-hole too big.
Then you're done! Feel good! Feel empowered! And remember that if you want something, you'll feel a lot happier with it if you make it yourself.

Saturday, January 21, 2012

Farmin'


When Sharon, of Gordon, ACT sent me the following email, she made my day.
"The blog is great. I spend 7 1/2 hours a day underground in the basement of Parliament House surrounded by machines. Day in day out same old dark cold environment so it’s just nice to see your sunny photo’s and imagining what it would be like to live off the land and not under it."
And she's a returning customer - love 'em.
When she sent me the teatowel she wanted me to use to make a skirt for her, she made my day again! Gotta love a bit of a bucolic-scene-teatowel when you're trying to craft a simple life out of the earth.
So it's official: Sharon's a day-maker (2 out of 2 is good enough for me).
And of course, the skirt was super-fun to sew. Like Sharon, I love all the colours in the skirt, especially red! So was pleased to be able to incorporate a little bit of spotty action. And I just happened to have a bit of drill the exact same tone of blue as the roofs and clouds and the little farmer-dude's overalls. Don't you just love a fortuitous fabric-matching event?
The teatowel had a few holes in it, so a pocket was necessary for cover-up (yes, the pocket is lined in red polka-dot. Couldn't help myself). It's a little higher than your average P&E pocket, but I just could not bring myself to cover up the little clothesline.
Pretty much one of the cutest teatowel features I've ever seen (and believe me - I've seen a lot of teatowels).

Friday, January 20, 2012

things in bottles

My sister used to tell me that I was a natural born homemaker. She even made up a song about it. And yes it is a little bit true. Despite my strong feminist sensibilities I do get a bit Virgoan about domesticity. I like wearing ye olde aprons and I like things to be nice and I like arranging and cooking and boy, do I like preserving. It started off with tomatoes, a few years back. I started to get really antsy about the number of tins of tomatoes we were buying. Tins from Italy (have you wondered how it's even possible for Italy to supply so many tomatoes to the world?). It's not just about the tomatoes from across the seas factor but also the incredible amount of carbon emitted + embodied energy in all those bajillions of tins we all use, not to mention the freaky BPA in the lining of said tins. We decided to take matters into our own hands. If we were going to eat tomatoey things when tomatoes are not in season then we needed to take charge of preserving them when they were seasonally available. Enter the Fowlers Vacola preserving system. We have a gorgeous green preserving pot from many years ago and it's such a joy to use with the thick sturdy glass preserving jars. I'd order 10kg boxes of organic cooking tomatoes from Alfalfa House in Sydney and we'd spend days jarring up tomatoes for the cooler months. We did a really basic raw pack method where you just shove chopped tomatoes into your jars then put the special lids and clips on and boil them from 40-minutes in the big pot. One year we ended up with around 60 jars - enough to see us through to October! We've not begun the big tomato preserve for this year mainly on account of us now living in southern climes where tomatoes have only just started to ripen.


However we have not been without the tomatoey preserve action entirely. Our local food co-op - Candelo Bulk Wholefoods is really great at marking down fruit and veg when it starts to get a little worn. So over the course of a week I compiled a mega bowl of $1 - $2 a kilo organic tomatoes and what better way to start the tomato preserving than with tomato sauce. Wowee, has it gone down a treat! Oh and just to be clear I'm talking tomato relish type sauce, you know, sweet and spicy good with sausage rolls and cheese toasties and meat and eggs. I used a variation of a recipe we got some years ago from our friend Claire. But just today realised I'd unconsciously used the recipe from Frugavore by Arabella Forge. I guess there are only so many ways of making tomato sauce. Part of the thrill has been how readily the kids have adapted to this homemade version of the sauce from a bottle from the supermarket they love so well. Ah sweet relief.

Prior to the tomato beginnings I dipped my toe into the realm of savoury jams a la onion jam. Our local producers market was experiencing the Spring paradox wherein Spring has sprung yet the produce is still catching up (of course!) so there's a bounty of silverbeet, onions, leeks, potatoes, lemons and that is all. What's a preserving lover to do but make some onion jam?

The end result was a dark, sticky mass of sweet fragrant deliciousness so good with sausages!
The house was awash with the aromatic amazingness of apple cider vinegar, sugar, lemon, cloves and caraway seeds. It took my breath away. I'll post the recipe at the end for those so inclined.

PS: The plums on our tree have ended and for a last hurrah I whipped up this pretty little cake. It's a stone fruit cake rich with vanilla bean and polenta and yoghurt and rapadura sugar. A real delight after a light meal.


Onion Jam
(makes about 8 - 10 small jars)

3kg of onions (peeled weight)
3/4 cup salt
12 cups sugar
6 cups of apple cider vinegar
3 tblsn lemon juice
6 tspns whole cloves
9 tspns caraway seeds
1 tblspn of grated lemon rind

Slice the onions thinly (preferably in a food processor). Mix with the salt and leave to stand for 2 hours.

Drain in a colander and rinse with cold water.

Place the cloves in a small piece of muslin and tie at the top.

Bring the sugar, lemon juice, lemon rins and vinegar to the boil while stirring. Add the bag of cloves, caraway seeds and onions.

Bring back to the boil for 2.5 - 3 hours or until a jam-like consistency.

Allow to stand for 5 minutes. Pour into warm, sterile jars and invert until cool.

Extra-delicious tomato sauce
(makes 4 - 5 passata size jars)

4kg of ripe tomatoes
6 cooking apples
6 onions
6 cloves of garlic, crushed
5 cups of apple cider vinegar
4 cups of sugar
salt and pepper to taste
2 tspn mixed spice
2 tspn whole cloves
2 tspn cayenne pepper

Peel and core apples and chop roughly. Peel and chop onions. Chop tomatoes.

Put chopped veg into large pot and add vinegar and garlic. Cook for an hour or more.

Take off the heat and blend.

Return to the heat and add the spices, sugar, salt and pepper. Cook for another hour or until thick.

Pour into sterilised jars and invert until cool.


Tuesday, January 17, 2012

Frocks for growing

You may remember Megan and Ben from around this time last year when I made them some bunting for their gloriously lovely wedding fest. Well, now they are growing a baby - yay!
Megan, like many other pregnant ladies, has been having a ghastly time finding non-ugly, non-sweatshop and non-expensive clothes to accommodate her growing tum. P&E to the rescue!
I made her some Megan-sized versions of the skirts and dresses that Pearl and I wore when we were pregnant, to see her through the coming months of growing-ness.
The dress is my basic bias-cut A-line. Flattering, with a good mount of give for bubba expansion, and made from an op-shop sheet Olive and I bought from the Narooma Vinnies on the day we moved to Bega (we had to make many, many stops that day, on account of Olive's car-sickness, the highlights of which were the op-shops and Bateman's Bay mini golf).
When I think of Megan, I think of blue and green, for some reason, so this sheet was an obvious pick.
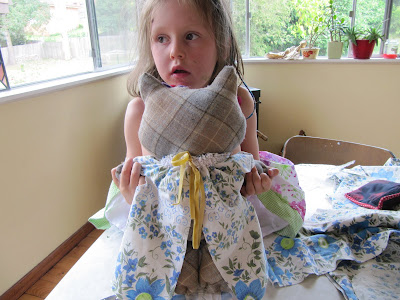
When I was cutting it out, Olive asked if she could help. Of course! I love having her hanging around helping when I'm sewing - it inevitably leads to her making up some elaborate, gorgeous costume/landscape/scenario involving the offcuts. On this occasion she decided she wanted to make a dress for her toys, so I grabbed the opportunity to show her how to make what I think is the cutest, simplest dress/top ever, which can be adapted for toys, babies, kids and adults alike.
It's based on a little top I had when I was a baby, which my mum made. I made a bunch for Olive when she was little, and a few for other cute babies I know as well. It's a really great, basic design, good for beginners, and it's easy to adapt and fancy-up, if you're that way inclined. Here's how it goes:
Firstly, measure the length you want the top to be. For Olive's Niki-cat, this meant floor length. Note that the edge on the left is a folded edge, so the rectangle Niki-cat is lying on is actually doubled over.
Now, make a long rectangle that is the length of the dress on one side, and 2x the total width of the bottom hem of the dress on the other.
Now, fold your long rectangle into quarters. Measure the length from Niki-cat's neck to her shoulder, and mark this same length from the top of the folded rectangles. Cut a little scallop shape half moon thing. This makes the sleeve (if you're making this top for anyone other than a toy, you'll probably want to encase the scallop-cuts in bias binding so they don't fray when you wash it).
Now, you need to make something to thread your drawstring through. We used some braid that I found on a council clean up, but if you don't have anything like that, just fold the top over twice and sew along to make a tube, kind of like if you were hemming it.
Now, thread your drawstring and pull it around the neck, then tie at the back. Cute stuff!
Depending on who you're making it for, and how often it's going to be washed etc, you'll want to finish off the hems and edges properly, either with bias or just by turning them under. Give it a go!
When I was finished making Niki-cat's frock, I got started on Megan's skirt, which was to be made using a phenomenal 'Australian Wattle' teatowel, which she and Ben hand-delivered to my workplace in Bega as they kayaked and camped their way up the coast from Melbourne to Sydney.
I LOVE the teatowel a) because of its unashamed intermingling of the common names and latin names of the wattles it features, b) because it's wattles, and wattles are cool and c) because it's from the wool capital of the world!
The skirt is pretty much exactly the same as the classic P&E A-line, but with no zip, a slightly gathered-above-the-rump thing, and a big wide stretchy band on the top to accommodate pregnant expansion.
THE COMFIEST SKIRT EVER. I wore mine looong after Olive was born, especially in the winter, when the stretchy band keeps all lower-abdominal areas extra-toasty.
I'd always been quite partial to a bit of wattle action, having been in the yellow wattle 'house' in primary school (you know the groups you're in for athletic carnivals and such??). When the local Landcare co-ordinator (also, handily, our neighbour) came to check out our land to see what was happening, we traipsed all over the place, oohing and ahhing over the many varieties of little baby seedlings coming up everywhere on account of the cessation of decades-long grazing. I felt so thrilled to see the diversity of native flora that was hanging out, just waiting for a chance to rise above the dairy-cow fodder. Amongst these many little seedlings and native grasses were several tiny Acacia mearnsii - Black Wattle.
Some people consider these to be weeds, but we choose to see them as an asset. Firstly, they are short-lived, meaning that you can use them as 'nursery' plants to shelter your precious fruit trees and delicate natives like Indigofera australis - Native Indigo - while they get established. While they're growing, supporting and sheltering your orchard, they're also fixing nitrogen in the soil, because they're leguminous. When they're growing, you can prune them and use them as mulch, and then when they die - more mulch! I don't know about you, but this all seems very exciting to me. And having nursery trees on a baby-growing skirt is pretty ace.

Monday, January 16, 2012

More t-blouses, more figs

Yay! More t-blouses! This time for Bec, (she of the super-colourful skirt) so bound to be fun times. Bec authorised "cute" so I felt emboldened to use this sheet that I've been carting around, loving, for quite some time. You may well recognise the print - it was a favourite from the era of my childhood, and I'm pretty sure I had a little baby quilt from the same fabric. Maybe the reason I love it so much.
I've always been a bit nervous to use it for some reason. Perhaps it's too cute? Perhaps I am alone in my appreciation of the bold, primary-coloured lions and weird letters and funny bear things in hot air balloons?? But I figured if one person was going to appreciate it, it was Bec, so I'm giving it a whirl. Bec: if I'm way off the mark with this one I promise to make you another.
Now, a word on Bec. I have never actually met this lady, but I freaking love sewing for her, and I freaking love (almost as much) emailing with her. She is pretty much the funniest email-writer of all time. Seriously!! (No, really, I never exaggerate and I never make hyperbolic statements). It's one of the absolute joys of this sewing gig - 'meeting' people, getting to 'know' them, then making them a bunch of clothes they love, and sometimes, when I'm lucky, getting feedback about how the clothes have been heading out to the beach, riding bikes, picking fruit and what not.
Now, for the second top. Bamboo and some kind of non-descript daisy flower thing. Love the contrast. What more can I say?
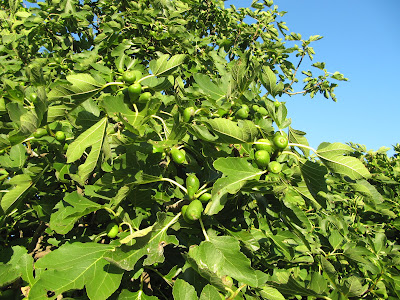
Luckily for me, and Florence (she wanted a night off) and especially you, dear reader, Bec and Pearl are pretty much exactly the same size. She resisted, but I eventually managed to rope her in to modelling for me, posing her in front of our fig tree, which seems to be heaving with a second round of figs coming on. Don't know what that's about, but it certainly makes for a delightful background for Pearl in Bec's tops.
And it will hopefully furnish me with a chance to try out some car-drying, helpfully suggested by the delightful chaps over at Little Eco Footprints. Charming, exciting stuff.

Sunday, January 15, 2012

The Best Lady

Lovely Beth, of Marrickville, will soon be attending a wedding. How glorious. In addition to the already inbuilt gloriousness of a wedding, I suspect that this wedding is probably going to be a bit extra-glorious on account of the fact that a) it's at the Vanguard in Newtown, and b) the invitation looks like this
Furthermore, Beth is going to be the best lady at the wedding. Needless to say I was pretty dern excited when Beth asked me to make her a dress, and when the link she included in her request email suggested that she was a fan of one of my extra-special vintage patterns. You may have noticed that I find it hard to get past my favourite dress pattern, ye olde V neck-circle skirt 50s number. Especially when I have a superb circular tablecloth just waiting to become a circle skirt on a fab-o frock. I really enjoyed sewing for Beth - she was an excellent ladyclient! - most notably because she had a great idea of what she wanted, and what would suit her body shape. This is a huge bonus for a sewing-person like me, who is more often than not sewing things for people I can't actually see or try things on. Even with Florence's help, this is still a kind of tricky thing to do, so I love it when people can say "hey, I think I look rad in a full skirt" or not, as the case may be. Top stuff.
I was slightly nervous about using the tablecloth (even though I am in love with it, and had actually been saving it for my own personal use) because the bride had apparently requested no white, pink or red. But a bit of email back-and-forthing cleared this up. I'm glad, because whenever I hear "no red" I think "why??". Makes no sense to me. Like people who don't like beer...
In addition to aforementioned circular tablecloth, I also used a green sheet and another tablecloth that was cream with grey embroidery, which I used for the bolero. When I made the bolero, I was actually kind of keen on the cream and grey (what is happening to me??), but when Florence tried it on with the dress, it was kind of, how should I say, a little bit blah, so I embarked upon a little dyeing adventure.
Back in the day, I was a huge dyer or petticoats and what not. Basically anything I could get my hands on became rainbow coloured at the mercy of my special, dedicated dyeing pot and a cute little tin of dye. I cannot get my head around the fact that Dylon no longer make the cute little tins, and always struggle with the new-fangled sachets, but I get there in the end. Even after all these years of making things change colour, I still love the feeling I get when I see a billion items hanging on the line, all in the same colour. Beautiful. I get the same feeling when I go into op-shops that are arranged by colour. Why on earth would you not do that when it looks so freaking great??
But I digress...
Beth's bolero, we decided just had to be purple, to pull out the beautiful purple flower buds in the kick-ass circular ex-tablecloth.
I hope you'll agree, this was the right choice, and I was super-pleased with the resultant colour combo. I also love how the dye pulled out the embroidery, because it's a bit unusual and a bit beautiful, I reckon.

Friday, January 13, 2012

Happy kids on a breezy Autumn-like day

Yesterday was sunny and cool and breezy here in the south. One of those days that feels almost Autumnal, yet we are so far from Autumn we know it will be hot again any day soon...In recognition of the deliciousness of the day we headed to our land for an early dinner and dam swim for the kids.


I dunno about you but the dam swim is mucho unappealing to me, not only is it shallow and muddy but it's currently covered in Azolla. Not that Olive and Oscar seem perturbed, in fact quite the opposite. They bound down the hill towards the dam shedding shoes and clothes in order they can immerse themselves as soon as possible. Once in they roll and loll in the muddy waters happy as, well yes, pigs in mud. It warms our heart to see them so at ease and so happy in this place that will soon be our home (just as soon as we build our mini-straw bale with Frank Thomas and get a water tank and some solar panels etc etc.. but plenty more on that later). For now, our 7 acres is a place for picnics and plans and discovery and rolling in mud.


We built our fire and cooked our corn, It is truly the most delectable corn you can imagine. Grown nearby on the river flats it is almost obscene in its sweet juiciness. While the corn cooked we heated up a pot of our version of Jude Blereau's Cowboy Bean and Quinoa stew. Now it's hardly fine dining but golly, it is more-ish and nourishing and the nude, wet, happy kids eat so well when anything resembling tomatoey beans are on offer. Some people say I'm a little neurotic about ensuring the kids eat well and maybe I am but it is certainly satisfying to my mumma sensibilities to see our kids eat whole foods I've prepared for them. I'll post the recipe at the end for those in need of some easy pease, protein rich meals to satisfy the discerning kids in your life.


This recent land visit confirmed that the plums are finito but the blackberries are on the brink of readyness. We're torn in our relationship to the blackberries choosing, at this stage, to focus on their culinary attributes rather than their pestilent weedy nature. It's such a thrill to see the number of native raspberry plants cropping up across the acres as we imagine summers of the future and the berry cornucopia we will enjoy together.

These simple times together are so good. They fill our hearts with warmth and strengthen our resolve that this crazy shenanigan of building our own straw bale house and creating a food forest garden from nought + relying on the sun for our energy and rain for our water is all gonna be ok. And not just ok, actually pretty great.

Beans and quinoa stew adapted from Jude Blereau "Wholefood for Children"
will provide 2 - 3 meals for a family of 4

1 cup quinoa
1 tablespn lemon juice

1.5 - 2 cups of black eyed beans
olive oil
1 onion, slices
3 cloves of garlic, sliced
1 green capsicum, seeded and finely diced
large pinch of dried oregano
large pinch each of cumin and dried coriander
1 - 2 carrots, finely diced
1 sweet potato, finely diced
1 zucchini, finely diced
2 tblespns rapadura sugar
2 tins of diced tomatoes
salt and pepper

Place the quinoa in a bowl, add the lemon juice and cover in water. Leave to soak for at least 6 hours. Drain and set aside.

If using dried beans you should soak them overnight. Drain and set aside.

Heat the oil in a big pot, add onion and garlic and gently fry. Then add the herbs and spices and cook for a few minutes. Add the diced veg and put the lid on and cook for 5-minutes until it's starting to brown. Add the tomatoes and a little extra water, bring to a simmer. Then add the beans and quinoa and enough water to cover them. Cook gently with the lid on for a couple of hours until the beans are soft. Add sugar, salt and pepper to taste.

We like to eat it with some Barambah sour cream and grated cheese. And if we're feeling really fancy we make it into a Nachos kinda thing with some extra special organic corn chips.

Thursday, January 12, 2012

Oti: the Force will be with you... always

In addition to the quilt I made for Rochelle's baby who's still on the inside, I also made this Star Wars quilt for her little boy, Otis. I just had to share these pictures because he is the most adorable little dude!!! And doesn't he look like the Force is with him?!?!?
Rochelle requested this quilt for Otis as a little sweetener for the dummy handover. So far, things have gone well! The quilt is made from a bit of vintage fabric Rochelle bought online, and it's lined with wool batting. The back is soft blue jersey, to make it all extra snuggly. The 'handle' is made from a piece of tape I cut out of the inside of a vintage suitcase. I loved the texture and weight of it. I then hand-stamped it with 'THE FORCE WILL BE WITH YOU... ALWAYS', just for a little extra somethin' somethin'.
And I have to admit, even a luddite like me can see the benefits of a vintage-looking iphone photo when we're talking about a quilt like this one.

Dear Suse, I'm so happy to be making your frock...

I think one of the many reasons I love making wedding dresses so much is that my own wedding day was super spectacularly fun and wonderful. I know how great a wedding can be! So I always feel honoured to be able to participate in and contribute to other peoples' weddings in such a special way.
Pearl's and my wedding day was a gloriously handmade affair, with all our loved ones pitching in to provide food, decorations, music and blessings. And, because we're not technically allowed to get married because of the havoc we will inevitably wreak upon the nice ol' convention of the nuclear family's precious values, we didn't have to get a stuffy celebrant to be in charge of our special day. Instead, we had our dear friend Sarah as our MC, while the lovely and extremely talented Ms Genna played us a love song on her fiddle. Couldn't have been more perfect.
My mum and I made our dresses, Pearl's wedding ring was handmade, and mine was a gift from my nana, which she gave to Pearl as a part of the ceremony. Not a dry eye in the house!!
I was reminded of all this recently when I received the fabric selection provided by my latest wedding dress client, Suse. The colouring, as you can see, is so similar to my own dress I couldn't help but laugh. How lovely!
When Suse sent me some pics of the dresses she's into, I was pretty excited because they were mostly all from 'my' era, the 20s and 30s. Somewhat ironically, I actually met Susan when I taught her at Uni... a course on modernist literature from the 20s and 30s. Freaky dude! So it is especially fitting that the vintage component, including the AMAZING beaded collar you see before you, has an appropriately and authentically 'between the wars' story behind it. When I was a child, you see, my mum volunteered for Animal Welfare, and met tons of crazy cat ladies. I thought they were all pretty cool, but one in particular was a standout. When she died, she left her whole house to Animal Welfare, including her collection of costumes and accessories from her time on the stage in the 30s and 40s. Hello suitcases full of amazing, beautiful, glittery, feathered velvet stuff. This collar belonged to that lady. It's showing its age, and, if we decide to use it, will need some extensive repair work along the lines of those falling down barns on Grand Designs that need about a million tonnes of concrete poured under them because they're slipping down a hill. But I reckon it'll be worth it, because the thing is beautiful and totally unlike anything I've ever seen.

But back to the dress. I'm thinking we use the collar, we have a nicely-falling gathered boob bit, which is I suppose a bit 'Ancient Roman meets 20s Paris", we use the spectacular piece of dusky pink and gold rose lace trim (also from suitcase of cat lady) across the front of the dress, and then we have a flowy, very long skirt with even a bit of a train, if you're up for it.
The back of the dress is totally open to the waist, but there's a huge flowy cape coming down from the back of the collar, which goes to the floor (can cover a bra strap if you want to keep the ladies contained). In all, it goes a little somethin' like this...
I'm not 100% attached to any particular colour combo, and I'm not sure what you had in mind when you bought the fabric in terms of layering or whatnot, but I think you'll agree that the collar looks totally ace next to the dusky satin, and I reckon the graduated pink would look fantastic on the cape, with the darkest bit at the bottom. There's also some blue lace, also from the suitcase, which is amazingly fine, and very unusually wide, but I couldn't quite see where it would fit, so it's not in my drawings. I reckon it could do something awesome in your hair, but not sure what you're thinking for your 'do.
The drawings, but the way, are pretty indicative of the main reasons I never did design or art at school, though Olive thought they were "very neat" which I suppose for a 5 year old, they are.

Wednesday, January 11, 2012

Azolla love


As I lay in bed last night, excitedly devouring 'Water in Permaculture' by Bill Mollison, I was absolutely thrilled to discover my good friend Azolla on Bill's list of totally awesome must have dam plants. Cool! admittedly, we don't have any of the other plants he mentions (yet!), but the azolla is currently covering THE ENTIRE SURFACE of the dam, so that has to count for something, right?
When I arrived home from work this afternoon Pearl suggested we go for some plum therapy - visiting the land and stopping off at 'our' plum tree. Obviously, she didn't have to ask me twice, so we bustled off up the hill, buckets and bowls in hand. Pearl and the kids stayed at the tree while I trotted on down to the dam to collect me some azolla. Our little vegie patch was in need of a good mulch, the azolla crop was totally out of control and, excellently, we'd just had a substantial dump of rain (and Olive's first ever hail!) so the timing was perfect.
The wind, this afternoon, was absolutely howling. The noise of it rushing through the trees up on our hill was simultaneously thrilling, beautiful and terrifying. And the volume of it was quite unbelievable. The immense wind had blown all the azolla to one side of the dam, and a huge flock of ducks were dipping in the bit of dam that had been left exposed, presumably excited to be able to access the water without the hindrance of pesky floating ferns.
As I luxuriated in the delicious contrast between the warm muddy dam-water on my feet and legs and the cold wind whipping my face, I collected handfuls of azolla. Anyone who knows me will be unsurprised to hear that I collected a lot more than I could comfortably carry, but I struggled on anyhow.
Pearlie, meanwhile was breaking in her brand new remodelled King Gees.
After searching for months for a pair of Pearlie-sized farm pants, to no avail, I decided to take matters into my own hands and picked up a couple of pairs of King Gees at the Bega Valley Swapsies clothes swap. I unpicked the side seams of the best pair, and used the other pair to make extender strips to sew down the sides so as to lovingly accommodate the awesome curvature of my lady friend.
Mission accomplished, and mission successful! Pearl declared them to be "the most comfortable pants of all time!", and they proved to be perfectly suited to azolla collection and distribution.

Monday, January 9, 2012

After the wild success of our fig-drying, I was keen to experiment with some other, more low-energy drying methods. Some gorgeous morning sun was hitting the kitchen table before work the other day so, with my backpack already on my back (I was just about to head out the door to work when this brain-wave hit me) I decided to start the air-drying procedure. I quartered the figs and put them on racks, then set the on the table in the direct sun, then covered them with some light muslin cloth, which I tucked in tight to keep out the critters.
I was pretty happy with myself, and trotted off to work feeling all excited about the figs happily dehydrating while I single-handedly rid the Bega Valley of waste. Alas, my fantasy was ruined when, 3 days later I checked the figs and discovered that some of them had grown mould and/or gone mushy. Poo. Genevieve helpfully pointed out that 60% humidity is probably not the best environment for air-drying food. Point taken.
The mushy ones went in the compost and the remaining ones went in the oven, for a repeat drying in a more controlled environment. This led to more success, so I was happy, though I have now been prompted to investigate the construction of some kind of solar dryer for our bounties.

Sunday, January 8, 2012

Oh Plums


As Annie mentioned we had a pretty special Christmas, just us four, in this place that is newly our home. There was plenty of good summertime eating, swimming, jumping, laughing, cuddling and just a little bit of gifting. However I think it would be safe to say that the discovery of a very laden plum tree across the road from our land was the highlight of our festive season. Hmmm yes probably not everyone's idea of a good time but it is ours. This tree kind of snuck up on us and we didn't find it until it was heaving with delicious red and yellow fruit. The delight we felt from this unexpected discovery was immense. It's an old old tree, gnarly and withered and so bountiful that the birds have had their share and there's still plenty for us, our friends and passers by (not that there are many of those on our hilly, dusty road).
We ate our fill that happy day and returned the next, wet and sandy and salty from the sea, this time with box in boot. We filled that box with fruit while feasting on the native raspberries that seem so happy to grow in and around our plum tree.

The native raspberry is a revelation for us, it's sweet and sour and uber-raspberry all at once. They seem happy in these southern climes. We recently found the most extraordinary grove growing atop a headland that we were traversing in search of a special secluded beach. We didn't find the beach but the raspberry bounty made our day.

We spent Boxing Day preserving plums for some winter pies and custards referring to our trusty little "The Big Book Of Preserving the Harvest" by Carol W. Costenbader. Carol is a tad obsessed with the threat of botulism and is very rigorous in her approach to preserving. We are a teensy bit less pedantic so if you don't hear from us after Autumn ends the big B may have gotten us. We did the raw pack method and made a light sugar syrup, cut the fruit in half and packed it into clean and sterile Vacola jars then added the syrup being careful to leave a spare centimetre at the top, closed up the jars with the excellent little rubber seals, metal lids and clips then boiled them up in our old school Vacola preserving pot. Before they were boiled they looked like little jars of sunset. Not so much the sunset look after the big boil but pretty nonetheless.


The fruit on "our" plum tree is getting riper and riper and the end of the season may be near. But for now, there's more preserving, eating and the anticipation of next summer's bounteous harvest.