When we were fretting about not having our footings poured in time for them to "go off" before the workshop, my dad consoled me by pointing out that at least the concrete would be a bit softer when it came time to drill in and attach the bottom plate. Turns out my dad's idea of 'soft' isn't really what I was thinking of.
This evening, with the help of our amazing, talented and generous friend Morag, the bottom plate was securely attached to the footings, but not without a small number of hindrances, mostly due to my own ignorance of the processes involved with drilling into concrete.

Lesson number one: an 18 volt cordless drill is NOT powerful enough to make holes in concrete. Lesson number two: cheap, crappy generators from Mitre 10, bought on the spur of the moment out of feelings of frustration will probably turn out to be cheap and crappy and not actually work properly.
But today, after returning the cheap and crappy generator and hiring a 'proper' generator to power my dad's 240 volt hammer drill, Morag and I drilled 70 holes into the concrete footings and bolted that bottom plate down while Meg, Pearl and Louisa kept the home-fires burning, making dinner and looking after the kids.

The generator made a ton of noise, and the drill, hammering away through the concrete and blue metal, was quite hard on the wrists and shoulders, but I tell you: having that thing finally in place was quite rewarding, probably on account of it having been quite an ordeal and taking quite a lot longer than I had planned.
The bottom plate assembly on our place is a little more complex than your standard bottom plate for a few reasons. Firstly, it's made up of 2 rails, 35cm apart, to hold the width of the strawbale walls. It's also slightly raised, thanks to 9cm squares of villaboard which I lovingly cut and pre-drilled in preparation for their special task of raising up the timber rails.
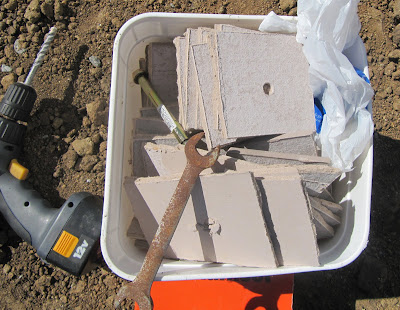
The reason the rails need to be raised is twofold: the 6mm gap created by the villaboard packing allows any moisture to escape under the timber without causing rot, and it also creates a gap underneath the bottom plate assembly for us to push through the high-tensile fencing wire which will be used to pre-compress our strawbale walls before the render is applied.

Now I know that if you are not familiar with strawbale construction this probably all seems kind of weird and maybe even boring. If you're feeling bored, I apologise. I can only say that I'm including these details in the hope that it will help out the people who are interested in strawbale construction by allowing them to learn from our mistakes.
But enough with the disclaimers. The rails of the bottom plate have now been attached using dynabolts.

We worked into the night, turning on the car's high beams so we could see the pre-drilled holes, and then relished the sound of the wind through the trees when we finally, after an hour-and-a-half of generator-ing and super-power-drilling, turned off the power.

We returned home to our women-folk and kiddies, tired and sore and pretty chuffed with our success. We drank
Pepperjack beer and ate mushroom risotto and wrote lists for the days ahead. Morag and Louisa are the first of our friends to arrive for the little-house-building. They've put in a mammoth effort to be here with us, amidst personal turmoil and family weddings. We feel so blessed to have them involved with this, our biggest craft project, and can already feel the love being poured into our new home, even though there's nary a wall yet built. Oh to sleep under that roof of love!!!


